By Shane Minnear
Welding the billet
I make knives for a hobby. I didn’t always have a love of knives…before knives it was The Six Million Dollar Man and Silly Putty. You can deduce I was born in 1970. My early passion for knives began when my father Alan handed me a book titled Step-by-Step Knife Making: You Can Do It! by David Boye. There was something about this book that took my complete attention and fascination. It was easy to read, had great photos and illustrations and made it seem achievable to make a knife. Dad was at the time an engineering teacher at Geraldine High School and had taken his senior students through the process of making a knife.
I was 20 years old and I decided to make my first knife from an old slasher blade I’d been given. I used a bench grinder to reshape the blade, then I soldered on a steel bolster and glued on a wooden handle. I made a sheath from deer skin and was as proud as punch. My second knife was done in much the same way, except I shaped the blade using a draw-file method to form a bowie knife. I used six pins on the handle, made a sheath and presented this to my brother-in-law as a birthday gift. Twenty something years later and that knife is still the main cutting tool in his kitchen.
Around nine years ago I wanted to make my son a knife. Finding an old file, I mounted a belt sander upside down in a vice and spent hours slowly grinding a bevel into the hardened steel. I was limited to the belts I could fit to the sander so I took my time, then used a buffing machine to get a reasonable finish on the blade. I added a handle and was done.
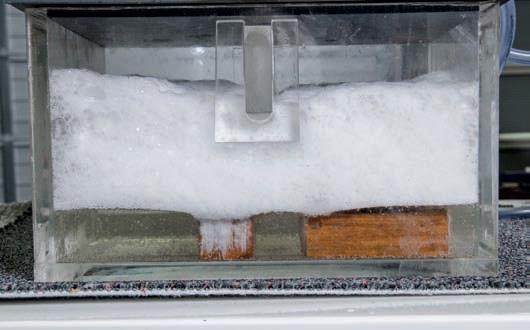
Applying the borax flux
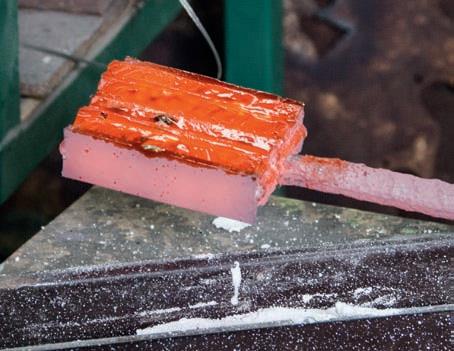
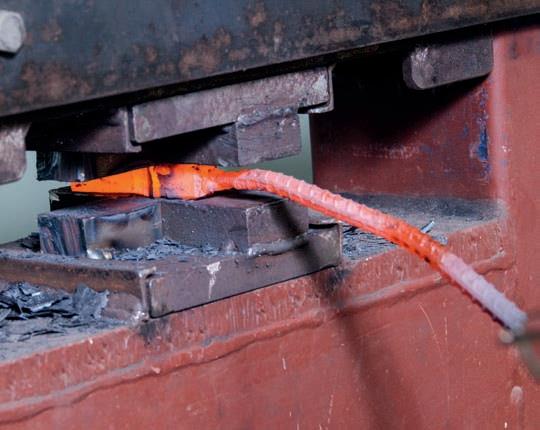
1: The fluxed billet 2: A flattening and drawing die 3: A billet in the press
Four tools and a furnace
A Grinder: At this time I was an active member of various online knife-making forums. Full of knowledgeable and time-generous knife makers, these forums lit me up like nothing before. It also made me realise that I needed a better belt grinder. I settled on building a replica of the wonderful KMG made by Beaumont Metal Works in America.
I could not afford to purchase and import one of these so I spent considerable time researching the grinder and scaling up plans based on photos. I had a local engineer cut out the steel plate for the parts and travelled to Geraldine so that my Dad and I could put it together. Two full days later and it was done, complete with interchangeable tool arms and a three-speed, step-pulley 1HP motor. I couldn’t believe the difference having a grinder like this made to my knife making. The grinder was fast, accurate and gave me a wide variety of belts to use. I added a large contact wheel and a small wheel attachment and this grinder has become the core tool in my workshop.
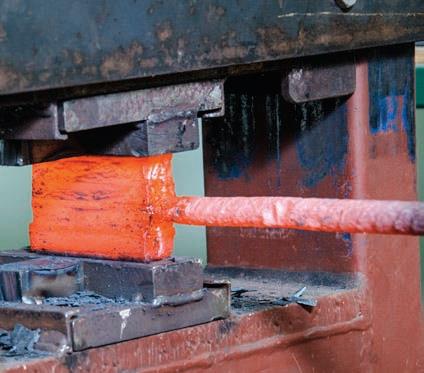
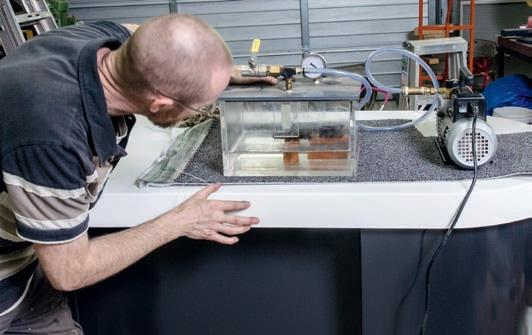
Pressing the knife billet
A book and an anvil:
While planning my grinder build, I also purchased several books. One of these got me wanting to forge blades—Wayne Goddard’s $50 Knife Shop. In this book, he showed that not a large investment in tools was needed to make and forge knives. I purchased a second-hand anvil and, following the advice in this book, made a one-brick forge that was heated with a venturi burner powered by a barbecue LPG bottle. Despite the simplicity of this design, the forge could heat steel sufficiently so that I could give it a manly bash on my anvil. Spurred on by my growing confidence, one of the first things I put in this forge was one-inch (25.4 mm) wire rope. Not realising how difficult it can be to forge wire rope, I nevertheless had a go and, low and behold I actually succeeded in producing a solid steel blade from it. I quenched the heated blade, gave it a temper and finally an etch. I could see individual strands of wire throughout my first forged Damascus blade. How pleased was I!

A press and a forge:
While chatting on a forum in 2007, I met a chap who lived just 30 minutes away. We met up a few times and talked knives and equipment. He had built a wonderful little forge that could get to welding heat (800°C+) and had an impressive 24-tonne hydraulic press build underway. Two years later, my friend announced he was moving to Australia and he’d be pleased for me to have first purchase option on his tools. This was a huge blessing as I purchased numerous hand tools, his forge, a MIG welder and his unfinished hydraulic press which came with brand new but as yet unfitted 8 x 5 inch (203 x 127 mm) ram, pump and control. Completing and commissioning this press became a priority so I worked steadily to build or buy the necessary components. Finally I was ready to fire it up and I asked my friend to come and help. He was leaving for Australia the next week so he was thrilled to witness his press start up for the first time.
But I had a problem. While fabricating parts for the press, I’d used excessive heat to weld a fitting on to the 25 mm-thick steel press plate. It meant the plate had wildly banana’d and I didn’t know how to straighten it. My friend and I had a think and I suggested we invert the plate, place it under the ram and press down to see if it would straighten up. My friend was sceptical but we had a go. We started up the press and moved the ram slowly down onto the upwardly curving steel. You should have seen my friend’s eyes widen as we both watched the ram effortlessly push the steel straight. He was seriously shocked to see the power of this press. In his gruffest voice (he was a few years senior to me) he warned me to be careful with this machine.
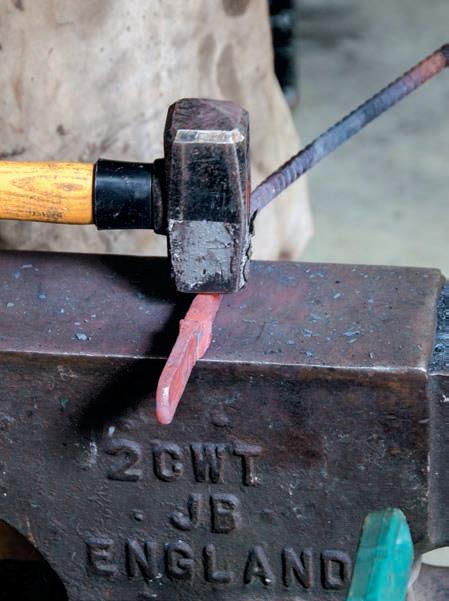
1: Shaping the knife 2: Shaping the bolster
I’ve heeded his words ever since. The press has greatly enabled me to make Damascus blades, making it easier to get the multiple layers pressed together and drawn out in length. Over the next few years, DIY tasks took priority around our home as we set up a hostel, converting a monastery we had purchased into long-term accommodation. I worked long weekends and week nights fixing it up, along with help from my wife and growing children. I managed just a little knife making between the DIY, full-time work and family life.
Within the past year I’ve put more focus on making knives, making Damascus steel using L6 steel from recycled sawmill blades blended with O1 tool steel. These two steels provide wonderful contrast…the L6 containing more chromium than O1, thus the layers are distinguished from one another.
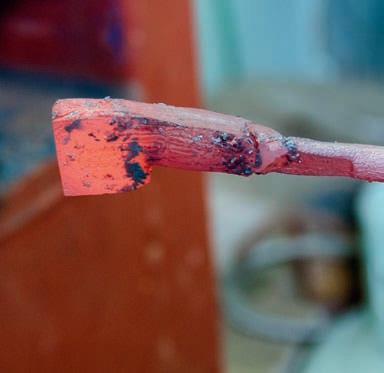
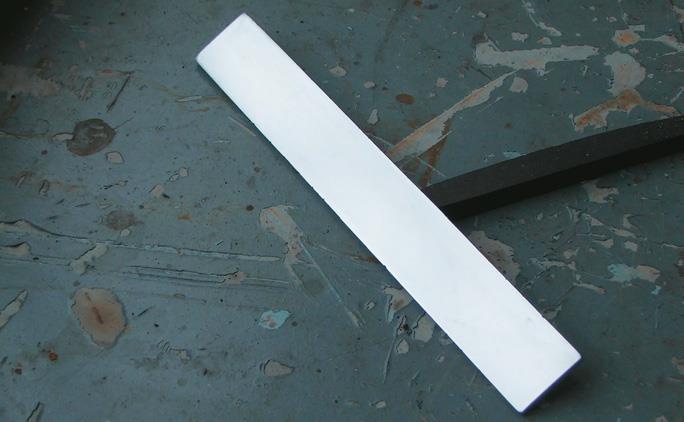
The cleaned up blank

1: Heating the blank 2: Checking for critical temperature 3: Hardening the blank in oil 4: Drilling the pin holes
Integral all the way
I’ve been forging blades that incorporate an integral bolster. This is technically quite challenging to do but I have found a way that gives good results every time. The forged bolster has a few advantages. It has no join between blade and bolster which removes the opportunity for material to get trapped. It offers a smooth transition for the thumb and finger to rest on. It also highlights the steel layers as they ebb and flow up onto the bolster and through in to the full tang…this is a beautiful effect and can be quite startling.
I love to make kitchen knives. This is because a kitchen knife is an everyday knife…I get to use them frequently, see them displayed on our magnetic wall holder and learn to refine and modify designs. I see how they function for specific tasks and can make different shapes and sizes accordingly. My wife Jade is my strongest critic and my staunchest ally. This makes me a better knife maker as I hear her honest feedback and make adjustments to the design, fit and finish.
The freshly hardened blank

1: Tempering in the oven 2: Preparing to temper the knife
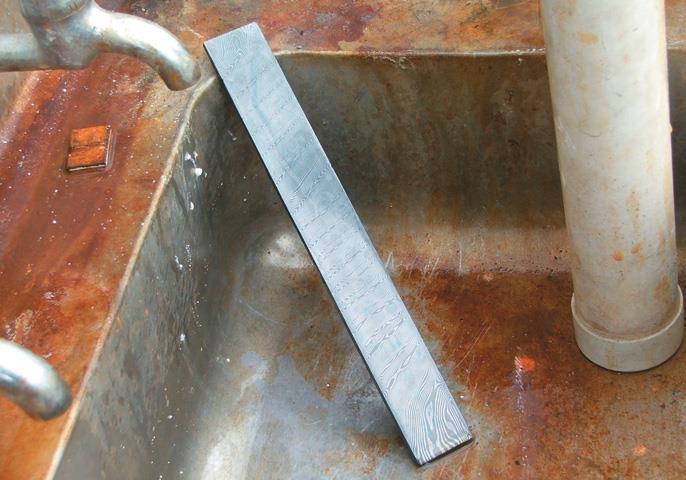
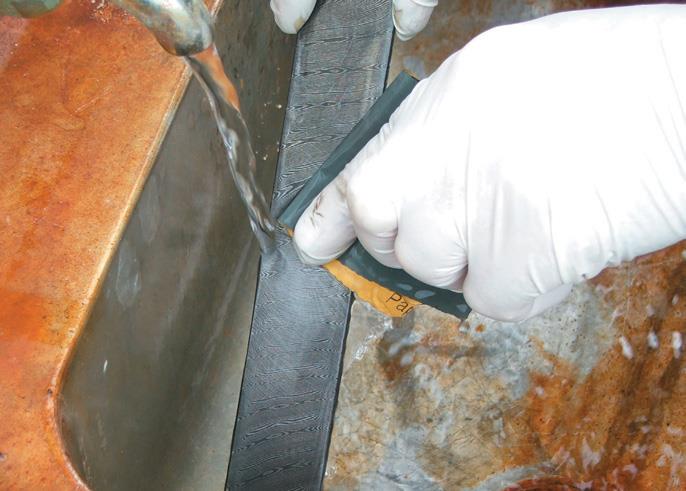
Stabilised timber
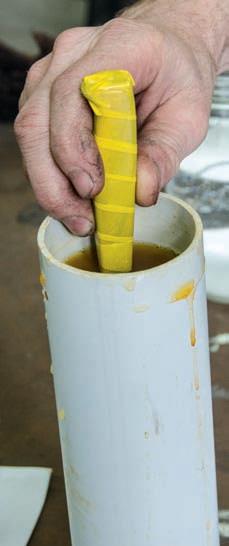
I’ve chosen to mostly use New Zealand native timber for my handles, although I also use jarrah and other exotic timbers that make wonderful handle material. I stabilise each piece using a vacuum process that impregnates a heat-activated resin deep inside the timber. Once stabilising is complete, a piece of timber gains 30-50 percent in weight. It looks and feels like timber but will now have eliminated much of the movement, cracking and distortion potential that timber can suffer from.
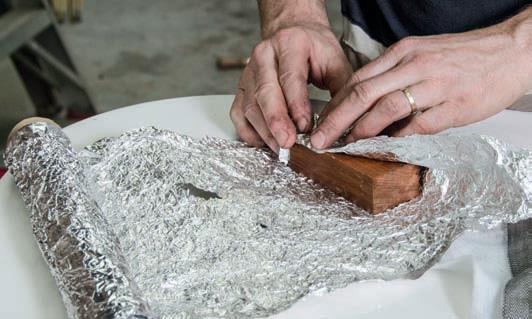
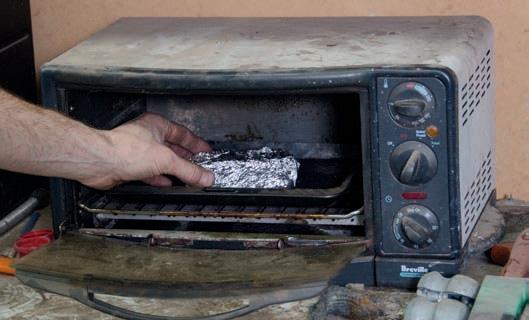
1: The stabilising set up: tank and vacuum pump. Note the weights to hold the timber 2: The vacuum at work. Note the amount of air drawn from the timber 3: The impregnated timber wrapped in foil for curing 4: Oven curing
Hammer-ins
Knife makers are great people and I’ve met makers both online and around the country. I have met up with a couple of Wellington blokes to have forging days and this is a fantastic way to learn and share ideas. John Taylor (Alchemy Knives) makes nice drop-point hunters while Casey McNeil forged a lovely feather Damascus blade at one of our hammer-ins. I enjoy keeping in touch with the community and interacting with fellow knife enthusiasts.
While selling a selection of knives at recent markets, I’ve been amazed and thrilled at the response they receive. Many people stop and look…not everyone is a buyer but by and large most people appreciate the beauty of Damascus blades and native timber handles. People understand the effort and soul that goes into a handmade knife (or any handmade craft for that matter) and appreciate the result. People have told me that one of my knives would become an heirloom piece in their home; others said they wanted to treat themselves to a really nice knife. Still others wanted a knife like this to show their friends and many people wonder how the pattern in the blade has been achieved. When told that these blades had 162 layers they were surprised to say the least.I have set up http://stabilizedwood. co.nz and “facebook/stabilized wood” to market my knives and sell stabilised timber to knife makers, pen turners, hobbyists, jewellers and anyone else. I also offer a stabilising service for those who want to supply me with their timber.
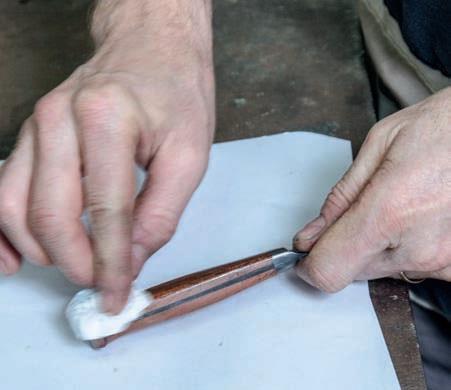
Checking the fit of the scales and bolster
1: The knife handle epoxied in place 2: Shaping the handle
How to make a forged, integral-bolster kitchen knife
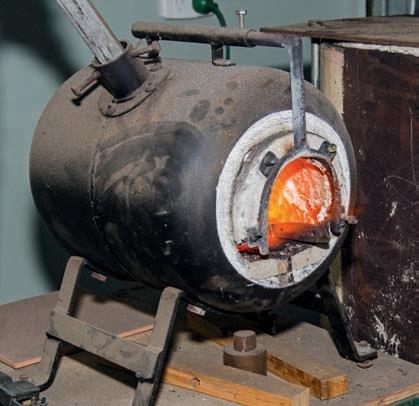
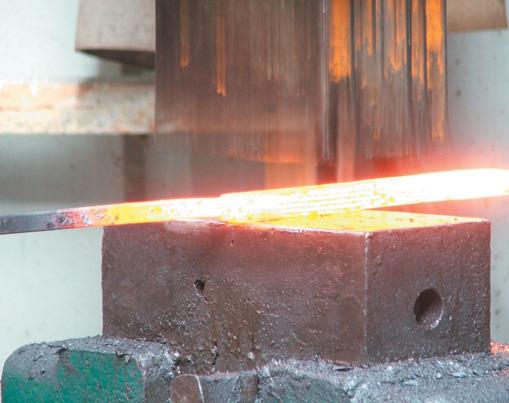
Prepare nine equal pieces of steel: 4 of O1 and 5 of L6. Each piece is 150 mm x 25 mm x 10 mm. Alternate the stacking of the O1 and L6, then MIG weld them together. Attach a steel handle (I use concrete rebar) and place the billet into the forge. When the billet begins to show colour remove it from the forge and apply anhydrous borax to the steel (flux which helps the steel weld and drives out impurities). Return the billet to the forge and heat it until it is at welding heat (around 900°C).
I take the billet from the forge and press it in the hydraulic press then return the billet to the forge. I continue to heat and press the billet until it is welded solid and then begin to draw it out in length. When the billet is about 240 mm in length, I cut it into three pieces with a cut-off saw and stack then tack weld them together. I take care not to burn myself while I’m handling the hot steel. The billet is now 27 layers. Returning to the forge, I dust the billet with flux and, when welding heat is achieved, I press it again. I repeat the above process until once again the billet is 240 mm in length then cut it into three pieces again, tack weld them then return the billet to the forge. The billet is now 81 layers. With successive heating, I draw out the billet until it is 240 mm in length, cut it in two, stack, tack weld and return it to the forge. The billet is now 162 layers. After more forge welding, the steel is drawn out again. When it is 240 mm in length, I use a die consisting of ball bearings welded to a press plate to indent both sides. This disrupts the layers and forms a “pool and eye” effect in the steel.

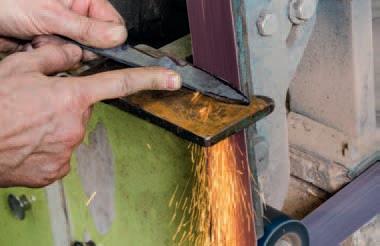
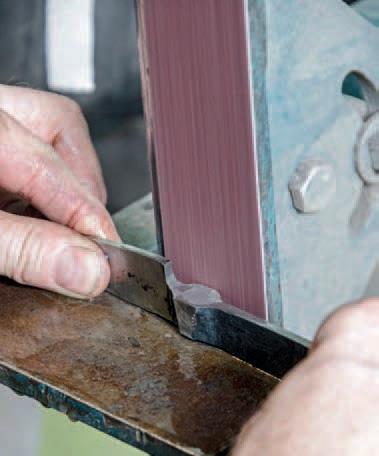
1: Bevelling the knife blade 2; Refining the blade with finer grit (up to 600).
The knife before etching and polishing
I return the billet to the forge and press out the indents, then forge it to 300 mm in length. Removing the steel from the forge, I cut the blank into knife-size pieces…something like 60 mm x 35 mm x 15 mm. I weld a handle to it and return this small billet to the forge to begin shaping it into a knife. First I draw out a rectangle then use the press with reversed flattening dies to form a handle shape.
More forging and shaping on the press follow to shape the blade, the bolster and the tang. When the blade shape is almost achieved, I use a hammer and anvil to apply final shaping of the knife tip, bolster, finger guard and tang. When forging is complete, the hot blade is placed in vermiculite to slowly cool and thus anneal the steel.
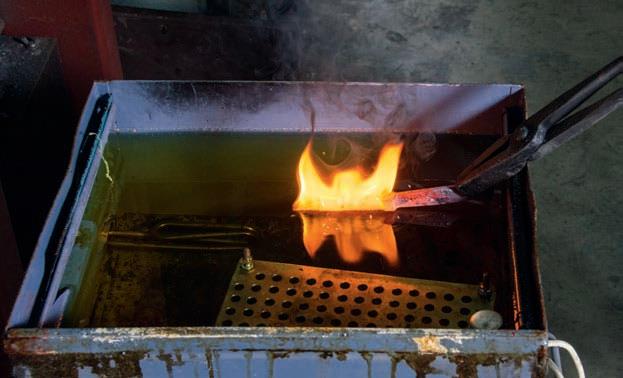
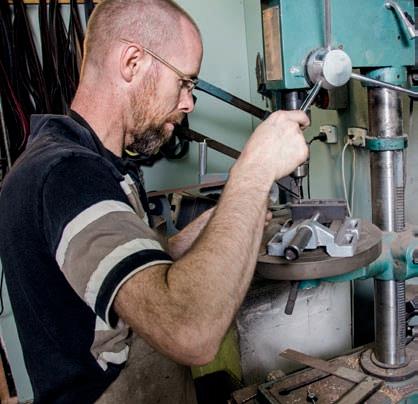
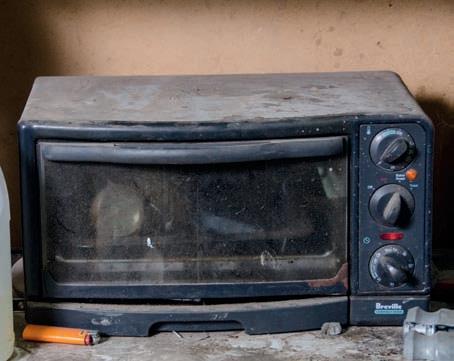
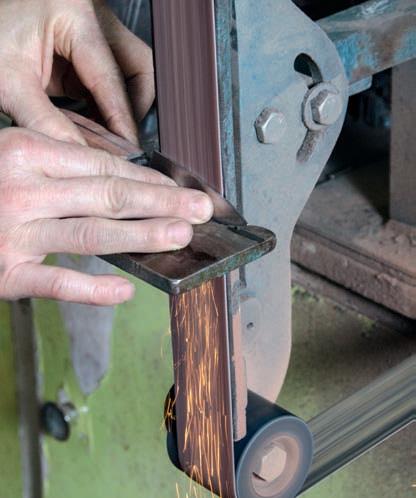
I can now profile grind the blade using a 36-50 grit belt. I grind all the sides equally and drill rivet holes in the tang. I return the profiled blade to the forge, heat it to critical temperature (the point when the steel becomes non-magnetic) and quickly quench it in oil, holding it still in the quench until all the colour has disappeared from the blade. I then place the hardened blade in an oven to temper it for two hours at 220-230°C.


1: Neutralising the acid in baking soda 2: Etching 3: Polishing the knife handle with oil 4: Sharpening the knife to a wire edge
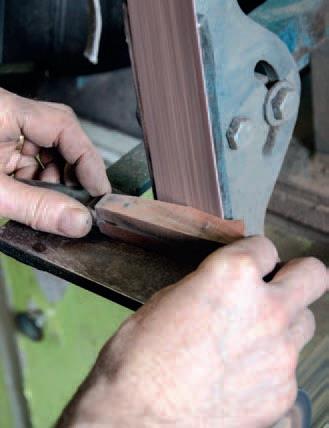
I begin grinding the blade using 50 grit and work all the way up to 600 grit, forming the main bevel, refining the shape and cleaning up the bolster. When complete I cover the blade with card to protect it during the next phase.
I prepare the stabilised timber handles by placing the chosen timber in a vacuum chamber, covering it with resin and begin the vacuum process. Air is pulled out of the timber, creating thousands of bubbles. After a few hours the bubbles should have ceased. I release the vacuum which draws the resin deep into the timber. It remains immersed in the resin overnight. I remove the timber from the vacuum chamber, wrap it in foil and bake it for two hours at 100°C. When cool, the timber is cut down the centre to create book-end handle slabs and test fitted to the tang and bolster.
I sketch the shape of the handle and cut it on the bandsaw. Minor adjustments are made to the timber to create a tight fit against the tang and bolster. Next step is to drill rivet holes into both pieces of timber using the previously cut tang holes as a guide. I then cut two stainless steel pins for the handle, epoxy the timber slabs onto the tang and insert the pins. I clamp the handle and leave it overnight to set. I use a 50-grit belt on the grinder to shape the handle, taking care to blend the timber with the bolster. I then work through the grits up to 600. The finished blade and handle should be smooth to the touch.
Showing the wire edge
To expose the Damascus pattern, it’s necessary to etch the blade. It’s important to wrap the handle with tape as the etchant can mark or stain the timber. Wash the blade with soapy water to remove all oily residue and place the blade tip-down in the etch liquid (ferric-chloride) and hold it for a few minutes. The pattern will start to emerge. Remove the knife, scrub the blade with steel wool to remove any black oxide, then return it to the etch liquid until the desired contrast level is achieved.
Finally, wash the etched blade in baking soda to neutralise the acid etch, then rub down the entire blade with a soft, oiled cloth. I use olive oil. I engrave my surname onto the right side of the blade. Finally I sharpen the blade using a 600-grit belt on the grinder to gain a foil edge, then leather strop the blade to a hair-shaving finish.
Examples of knives that Shane has made
Knife-making steel
Knife makers often prefer high-carbon steels because they can be sharpened to a very fine edge and they will hold that edge. They can be differentially tempered too so more or less temper can be applied to the blade edge and the spine of cheeks to achieve flexibility and a harder, more brittle edge. However most tool steels have some alloy in them to impart various desirable characteristics.
Manganese and silicon are added during the steel-making process to remove sulphur, oxygen and phosphorus from the molten mix. Manganese, nickel, silicon chromium, vanadium, molybdenum and tungsten increase strength. Molybdenum also helps the steel from becoming too brittle. Manganese improves the workability of the steel. Chromium helps the steel resist corrosion but can weaken it so it is usually included with nickel which also helps resist corrosion but imparts some strength and improves hardenability.
1095 and 5160 are commonly used in hand-forged knives because they are inexpensive, forgiving to work with and readily hand-forged. They are both standard carbon steels and both make a dependable, useable knife. 1095 gets its performance from the high carbon content. It’s commonly used industrially to make farm implements such as scraper blades, discs, harrows and excavator shovels. 1095 is a readily available and common steel.
5160 has much less carbon, but derives its good wear characteristics from the addition of a small amount of chromium. This minor percentage of chromium improves hardenability and wear resistance, but it is not enough to improve corrosion resistance. This steel is used industrially where a very hard and wear-resistant surface is required, such as gears, pinions, crankshafts and bearing surfaces. It is also used for leaf springs which are a common source of knife-making steel. Both these steels are relatively easy to work and harden.
O1 is a true tool steel; an alloy steel designed to be used to make tools. As such it derives its performance from the variety and effect of the alloys in the mix. It has a high carbon content for hardness but the manganese content improves its performance in the forge. The chromium content adds hardenability and wear resistance. The addition of vanadium and tungsten form incredibly hard-wear-resistant particles of vanadium carbide and tungsten carbide. It’s commonly used to make drills. O1 steel can be differentially tempered and it will take and hold an edge well.
L6 is similar to O1 in the general class of alloy, oil-hardening tool steels. Due to its lower carbon content, it has better shock resistance than the more highly alloyed types due to the relatively high nickel content. L6 steel is often considered to be one of the best steels available for knife making and is also often used to make saw blades. Knives made from L6 steel are not corrosion resistant.
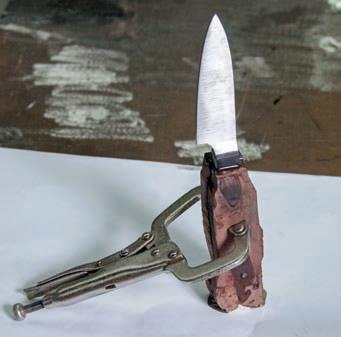
The completed knife
By Shane Minnear
Photos by Jude Woodside
The making of pattern Damascus
Centuries-old forging techniques produce striking patterns
By Matt James
The process of making what is commonly known as damascus steel has, in some ways, been a little shrouded in mystery. If you try to make damascus remember it is a process. You may not have instant success but look at what you are doing and try to evaluate what you may change in order to “get it right.”
1: Heating the billet 2: Wire the layers together
History
True Damascus steel or wootz was made in a crucible and cast into ingots and then forged. Examples of bladeware made from this steel date back to 600 AD. The Vikings, although not the first, did make some very complex bladeware us-ing twisted bars of damascus. Later in Europe and England during the 18th and 19th centuries there was a tradition of using damascus in the barrels of fine shotguns. Today, damascus is used mainly for knives but has other applications in jewellery and art forms.
In spite of being made as one homogeneous mass, this steel displays the patterning which results from making pattern welded steel (PWS, commonly called damascus steel). Pattern welded steel is made by stacking at least two types or more of steel in alternating layers to form what is termed a billet. These layers are then forge-welded into one mass, a bar of steel where the layers still retain their individual characteristics.The end-use determines the steel mix in the billet. Apart from considering the steel types available, you need to consider what characteristics you want in the finished damascus.
For a knifemaker, the ability of the steel to hold an edge is important. If flexibility is required then perhaps using mild steel in the mix would assist in this (not in knives). For decorative purposes only, for example jewellery, the maker can simply look at what will produce the best contrast. Yes, steel has colour and different steels will show contrast when etched and put beside each other.
Weld with hammer blows
Types
In types of damascus patterns, some of the steel is white or bright, some has shades of gray and some is black. The brightness is caused by a certain chrome or nickel content in the steel, the black by carbon. The steel mix and its elements will govern the final appearance. One mix I have made is 1075 and pure nickel. This is a very high-contrast mix, as the nickel is very bright and the steel quite black.
Apart from contrast, the final look is governed by the pattern we introduce. This is affected by the number of layers in the bar and what type of manipulation is done to the steel while you are forging it. One of the simplest forms of pattern is created by twisting the bar.
The subject of pattern creation is very wide-ranging and modern-day smiths have pushed the boundaries in this area. Some of the patterns you will see here have been made longitudinally in the bar and some in a loaf-type form where the steel has then been cut off as tiles.
Forge weld half done
Equipment
Before we light the forge, let’s look at the four methods you can use to move metal “in the shed” (the non-industrial, kiwi nutcase situation):
1. Hand hammer and anvil;
2. Power press;
3. Power hammer;
4. Rolling mill.
The hammer and anvil is what most people probably relate to when they think about forging. Hand-forging gives probably the best control for smaller work when in the hands of a skilled person. There is a lot of drawing out (extending of the steel) to make a damascus bar and for bars with a low layer-count, hand-hammering is probably OK. Using a press is a very practical way to make damascus although not the fastest. A press of 20 to 30-tonne capacity will normally suffice. I have made a press specifically for damascus, although a standard H-frame press can be used. The steel can be drawn out using flat or drawing dies and taking “bites” at the billet. The bite size is deter-mined by the power of the press. A lower-powered press will suffice, it will just take longer to do the job. The power hammer I have was imported as one of three used by the New Zealand Railways department. It can be a bit of a job setting up a power hammer and if you do come across one, it would pay to research how to do it correctly. I use both the power hammer and the press for my work. While the press tends to suck the heat out of the work rather quickly, the power hammer has the tendency to prolong the heat as a result of the hammering action.
There are plans available for rolling mills (check the internet). I don’t use one but I think they are a very practical way to make damascus – you could probably do it a few feet away from your neighbour’s win-dow on a Sunday morning.
Steel under power hammer
Forges
Once you’ve figured out how you are going to beat the metal, you just have to soften it enough to do so. I use two types of forge, both fuelled by propane gas. One type is venturi. This means the gas is piped into the forge and in doing so sucks in sufficient air to make the air/gas mix to create the flame. The second type is a blown forge. The air is blown into the forge using a squirrel-cage blower and the gas is mixed with it before entry into the forge. Each type has its pros and cons and again you will find plans on the net for both.
Billet
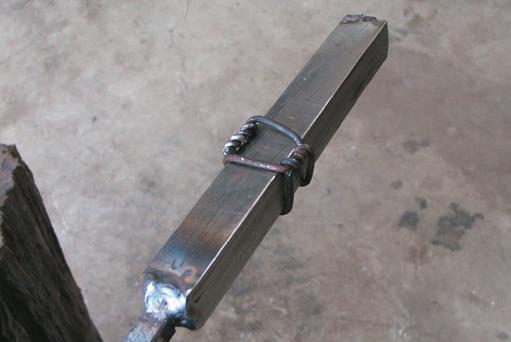
Cut the steel to size. The steel pieces should be as close to the same size as possible. I generally make billets with the same type of steel on the outside of the billet which means they have an odd number of layers in them. This does not have to be the case – it’s up to you. Stack your layers alternately on top of one another. The layers should be clean of rust, scale etc. The layers should then be welded together on the ends using say an arc or MIG welder (I would not recommend gas welding). This is just to hold them until the first forge welding is done. If you do not have weld-ing capability, then the layers can simply be wired together.
Then add the handle (you do need to weld this). I am not good at using tongs so I prefer to attach a handle. The size of the handle depends on the size or weight of the billet. If the handle is too small in diameter, the billet will hang from the end like a piece of spaghetti when you pull it out of the forge. The handle needs enough substance to keep rigid when hot. Then wire up the billet as in the photo.

Billet being folded
Forge welding
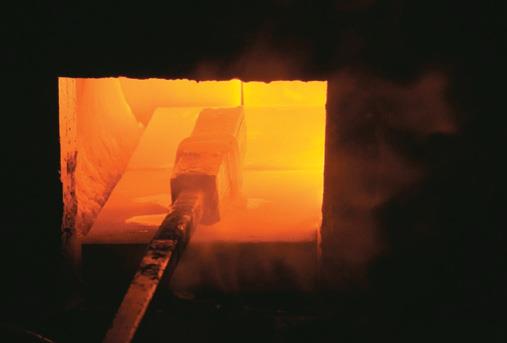
The forge needs time to heat up so don’t try to put your billet into a forge too soon. The billet will re-quire a certain “soaking” time, de-pending on a number of factors, to get it all up to heat. If your billet is large in relation to your forge, it will take longer. You are looking to achieve a yellow heat – 1300+ degrees. If the billet starts shower-ing sparks, then it is too hot. I use borax as a flux on the billet to stop oxygen from creating scale and in terfering with the welding process. Borax should be liberally applied to the billet throughout the process. When the billet is up to temperature, quickly remove it from the forge and weld with overlapping hammer blows on the anvil from the far end to the wired up section. Remove the wire with side cutters and repeat the process for the other end of the billet after reheating it. You only have about 6-8 seconds to complete the forge-weld. After that, the billet has cooled below forge-welding temperature.
Try not to cover too much area in the forge-welding process; rather make sure the area you cover is done well. The borax tends to fly everywhere so good protective gear is a must and it pays not to have your girlfriend standing next to you in a clean dress. No 3 welding goggles are good eye protection and keep the glare down from the forge.
Steel in the press
Drawing-out
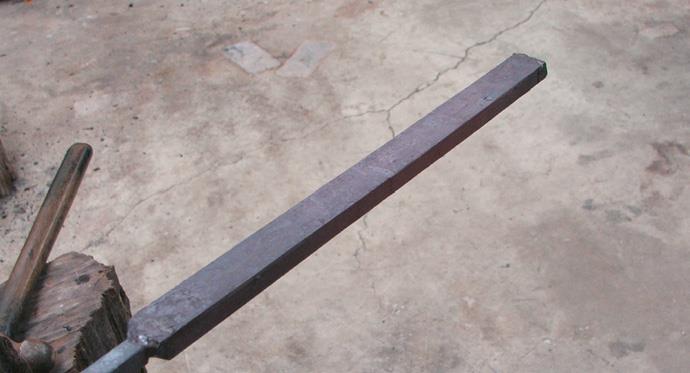
The process of drawing-out means the lengthening of the bar to a size that you can then fold in half to repeat the process of welding and drawing. By doing so, you build up the number of layers in the bar to the required number. I have drawn this bar out to about 1½ times the length I started with. Next I take the bar and cut the ends off it with a cut-off disc in a grinder (cutting and grinding outside for health reasons). This is to remove the two ends originally arc-welded together so all of the material we have is now forge-welded.
Then put a handle back on one end of the bar. Mark the bar exactly in the middle with a piece of chalk and cut almost through the bar with the cut off disc. Leave just a small amount of metal as a hinge. Turn the bar over in the vice and grind the whole of that side of the bar to remove the scale. Now lift the end of the bar that is not held in the vice and fold it back on the other end. This means that both ground sides will be against each other and the ends should line up. I should also add here that the forging of the bar should be as even as possible so that the sides and edges are parallel.
If the bar gets too cold during this phase you may have a problem with the folding over of the halves and the steel will want to break. Put the bar back into the forge. The small area of the hinge will heat very quickly and enable you to fold it easily. Flux the bar and re-turn it to the forge. The hinge will hold both pieces together and in line. I bring the bar back to weld-ing temperature and in this welding phase I use the press. The bar can be hand-hammered to weld it as before, but at this point I prefer to use the press.
Billet welded to 22 layers
The forge-welding process is a combination of pressure, heat, flux and cleanliness of the steel. Get that right and the welding process takes place. Once the steel is welded, a consolidation of the weld takes place as more work is done on that piece of steel. If the weld is not successful to start with, no amount of pressure or hammering alone will correct it. The area must be opened up, cleaned, fluxed and re-welded.
Grind the edges on both sides (so that one edge is not proud of the other) and the end where the handle is for the same reason. We are now back with the bar ready to draw out. The original bar had 11 layers but we now have 22 layers as a result of the fold. Simply continue in this manner, drawing out, folding, and forge-welding until we have built the layers up to the desired number.
The bars I make have between 20 and 250 layers in them depending on their end-use. It is easy to take the layer count up to the thou-sands because each time you fold the metal you are doubling the number of layers. However, once you are over about a thousand layers, the eye cannot differentiate between them.
Twisting the bar
Pattern Formation
I am now going to twist the bar I have made. The twisting should be done at welding heat or close to it. I use an old pipe wrench with an extra handle welded on the other side. Due to the heat of the steel it will twist very easily. I will now re-square and draw down the bar to its finished size. There is a large loss of material in the making of damascus because of the continuous scaling of the metal and the grinding and cutting.
Annealing
Now the bar is finished it needs to be taken to critical temperature (this is the temperature the steel would be taken to if you were hardening it) and slowly cooled. When the steel gets to critical temperature, it will become non-magnetic. Use a mag-net to check this if you are unsure. Depending on the steel you use, this bar will be at the dull-to-medium-red range. The bar should then be pushed into a container of either lime or wood ash. This retains the heat and allows the bar to cool very slowly. This is annealing and leaves the steel in a very soft form suitable to drill, grind, file or cut.
Bar annealing in wood ash
Etching
The final phase here is the etching of the steel to expose the pattern. The scale is removed and any pitting or other surface imperfections ground away. The higher the finish on the metal, the better the result when etching. It is commonly thought that the etching process will remove any imperfections. Not so. It tends to highlight them. Different acids will produce quite different results when etching. One that I have found to produce good results is ferric chloride at about a 4:1 mix. Do make sure to wear good protection against possible exposure of your skin or eyes to the acid.
Place the bar in the container of acid. You will find the pattern will show almost immediately but leave the bar in the container for say ten minutes to allow the etching pro-cess to start taking effect. Etching will be quicker on a warm day than in cool weather. Take the bar out, put it under running water and rub it down with a fine grit paper, preferably the same as you used to finish the bar with or finer. You are removing the sludge of fine oxide that has built up on the bar and will slow the etching process. Put the bar back in the acid and repeat. How deep you etch is up to you and really a matter of preference. When you are happy with the etch then take out the bar for the final time and rub down as before under running water, then neutralise the acid.
The neutraliser for ferric chloride is trisodium phosphate. But if you don’t have it handy, spray the bar with WD40 or similar and this should stop any rust occurring as a result of the etching. If you do have trisodium phosphate then make a saturated solution of that and put the bar in it for a few minutes. Well that’s all there is to it…
1: High finish before etching 2: After 30 seconds of etching 3: Rub down with fine grit
* Matt James is the director of Damascus New Zealand and lives and works near Taupo. More information about damascus steel can be found on Matt James’s website http://www.damascus.co.nz.